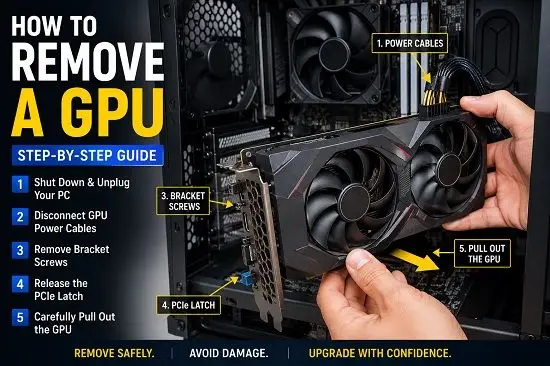
If you are upgrading your graphics card, replacing a faulty GPU, cleaning your PC, or moving a graphics card into another computer, you may need to know how to remove a GPU safely. If you are replacing an older card with a newer model, our guide to AMD GPU vs NVIDIA can also help you compare your options before buying a replacement.
Removing a desktop graphics card is usually straightforward, but there is one part that causes problems for beginners: the small retention latch at the end of the PCIe slot.
If that latch is still locked, pulling on the graphics card can damage the motherboard, the PCIe slot, or the card itself. ASUS specifically warns users not to force a graphics card out before releasing the PCIe latch, while AMD’s official removal procedure also requires the slot lever to be released before the card is removed.
This guide explains how to remove a GPU from a desktop PC safely, including how to disconnect the power cables, remove the mounting screws, release the PCIe latch, deal with a stuck graphics card, and prepare the GPU for storage or replacement.
Can You Remove a GPU Yourself?
Yes. Most desktop graphics cards can be removed without professional help if you are comfortable opening a PC case and handling computer components carefully.
A typical removable GPU is installed in a PCI Express x16 slot on the motherboard. It is usually secured in three places:
- The PCIe slot on the motherboard
- Screws or a retention mechanism at the rear of the case
- One or more power cables connected to the graphics card
Some newer motherboards also have special PCIe release mechanisms, such as ASUS Q-Release or Q-Release Slim. These change how the card is unlocked, so you should check your motherboard manual if the latch does not look like a conventional PCIe retention clip.
Before You Remove the GPU
Before opening the PC, prepare a clean, stable workspace.
You may need:
- A Phillips screwdriver
- A clean, flat work surface
- An antistatic wrist strap if available
- An antistatic bag for storing the GPU
- Your PC or motherboard manual
- A small container for screws
You do not normally need specialized tools.
The most important thing is to avoid rushing the removal process.
Step 1: Shut Down the Computer
Save your work and shut down Windows normally.
Do not remove the graphics card while the computer is running.
After Windows has shut down completely, turn off the power supply using its rear switch if your PSU has one.
Then disconnect the power cable from the wall or power supply.
AMD’s official GPU removal instructions recommend shutting down the computer and attached devices and waiting before disconnecting the cables.
Step 2: Disconnect the External Cables
Disconnect the monitor cable from the graphics card.
Depending on your setup, this could be:
- HDMI
- DisplayPort
- DVI
- Another display connection
Also disconnect any other cables that could prevent you from safely moving or opening the computer.
Do not pull on a cable by the cable itself. Grip the connector when disconnecting it.
Step 3: Remove the PC Case Side Panel
Place the computer somewhere you can work comfortably.
Remove the side panel according to your case manufacturer’s instructions.
Some cases use thumb screws, while others use a tool-free release mechanism.
If you are unsure how the panel comes off, check the case manual rather than forcing it.
Step 4: Discharge Static Electricity
Static electricity can damage sensitive computer components.
Before touching the graphics card or motherboard, discharge static electricity.
An antistatic wrist strap is the most controlled option. If you do not have one, avoid working on carpet, keep the PC unplugged, and periodically touch an appropriate grounded metal part of the case before handling components.
AMD specifically recommends discharging static electricity before handling the graphics hardware.
Step 5: Locate the Graphics Card
The GPU is normally the large expansion card installed horizontally in the motherboard’s PCIe slot.
It usually has:
- Video outputs on the back of the case
- Cooling fans or a heatsink
- A long connector inserted into a PCIe slot
- One or more power connectors
- A metal bracket secured to the case
If your PC has more than one expansion card, make sure you identify the graphics card before removing anything.
Step 6: Disconnect the GPU Power Cables
Look at the edge or top of the graphics card for its power connectors.
Depending on the GPU, you may find:
- 6-pin PCIe
- 8-pin PCIe
- Multiple 8-pin connectors
- A newer 16-pin GPU power connector
Press the connector’s locking tab before pulling it out.
Pull the connector straight and carefully.
Do not yank the cable or pull at an angle.
If the connector does not release, check where its locking tab is located. Forcing a power connector can damage the connector or graphics card.
Step 7: Remove the GPU From the Case Bracket
The rear metal bracket of the graphics card is usually secured to the PC case with one or more screws.
Remove those screws and keep them somewhere safe.
Some cases use a retention bracket or tool-free mechanism instead of conventional screws.
The graphics card should now be free from the case, but do not pull it out of the motherboard yet.
The PCIe retention latch may still be holding it in place.
Step 8: Find the PCIe Retention Latch
Look at the end of the PCIe slot where the graphics card is installed.
There is normally a small plastic retention latch that locks the card into the slot.
This is one of the most important parts of the removal process.
The exact design varies by motherboard.
On a conventional PCIe slot, the latch may be partially hidden underneath the graphics card.
Some motherboard manufacturers provide special release mechanisms that make the latch easier to access.
ASUS, for example, has Q-Release mechanisms that can use a button or lever instead of the traditional latch.
Step 9: Release the PCIe Latch
Before pulling the GPU out, unlock the PCIe slot.
On a conventional motherboard, carefully press the PCIe retention latch down or outward according to the motherboard design.
At the same time, support the graphics card with your other hand.
Do not use excessive force.
ASUS specifically warns that the graphics card should not be forcibly pulled out before the latch is released because doing so can damage the motherboard and the latch.
If the latch is difficult to reach, take your time.
You may need to move the GPU slightly to create enough room to access the release mechanism, but do not bend the card or pry against the motherboard.
Step 10: Remove the GPU From the PCIe Slot
Once the retention latch has been released, hold the graphics card firmly by its edges or appropriate structural areas.
Carefully lift the card out of the PCIe slot.
For a conventional PCIe slot, the card should come out with controlled, even movement.
Do not twist it aggressively from side to side.
AMD’s official instructions say to release the expansion-slot lever and then slide the card out of the graphics slot.
ASUS’s current instructions for standard PCIe removal describe releasing the latch and then lifting the graphics card out vertically.
The exact movement can vary by motherboard and PCIe release mechanism, so follow the motherboard manufacturer’s instructions if they differ.
Step 11: Hold the GPU Properly
Once the graphics card is free, hold it by its edges or sturdy areas of the card.
Avoid touching:
- Gold-plated PCIe contacts
- Exposed circuit-board components
- Small surface-mounted components
- Fan blades unnecessarily
You want to minimize the chance of contaminating or damaging the electrical contacts.
Step 12: Store the GPU Safely
If you are not immediately installing the graphics card somewhere else, put it in an antistatic bag.
AMD recommends placing a removed graphics card in an antistatic bag.
Store it somewhere:
- Dry
- Clean
- Free from static-producing materials
- Away from liquids
- Protected from impact
Do not place a bare graphics card directly on a carpet or other surface where it can be exposed to static electricity or physical damage.
How to Remove a GPU That Is Stuck
A graphics card that does not come out easily is one of the most common situations that makes beginners nervous.
The first rule is simple:
Do not pull harder.
If the GPU is stuck, one of the following is usually still holding it:
- PCIe retention latch
- Case screw
- Case bracket
- Power connector
- GPU support bracket
- Another retention mechanism
Go back through the removal process.
Check the PCIe Latch Again
The PCIe latch is the most common reason a graphics card refuses to come out.
Look carefully at the end of the motherboard slot.
Make sure the latch has actually moved into the unlocked position.
If the graphics card is large, the cooler may make the latch difficult to see.
Use a flashlight if necessary.
Do not insert a screwdriver deep into the motherboard to force the latch.
Check for a Hidden Case Screw
Some graphics cards are secured by more than one screw.
Check the rear expansion bracket and any case retention mechanism.
A single remaining screw can make it appear as though the GPU is stuck in the PCIe slot.
Check for a GPU Support Bracket
Large modern graphics cards can be heavy enough to require an anti-sag bracket or support stand.
If your system has one, remove or loosen it according to its design before attempting to remove the graphics card.
A support bracket can prevent the GPU from moving even after the case screws have been removed.
Check the Power Connector Again
Make sure every GPU power connector has been removed.
Do not pull the graphics card while a power cable is still attached.
Modern graphics cards can use different power connector designs, so do not assume there is only one connector.
What If the PCIe Latch Is Hidden?
This is common with large graphics cards.
The GPU cooler may cover much of the motherboard slot, making the latch difficult to reach.
Before trying anything risky, check the motherboard manual for the exact PCIe slot release mechanism.
Some newer motherboards have dedicated buttons or levers that make GPU removal easier.
ASUS’s Q-Release and Q-Release Slim systems are examples of motherboard-specific mechanisms designed to simplify graphics-card removal.
What If the GPU Will Not Release Even After Pressing the Latch?
Stop and inspect the installation again.
The latch may not have fully released.
The card may also be catching on the case bracket.
Check that:
- The power connectors are disconnected.
- The case screws are removed.
- Any support bracket is removed.
- The PCIe latch is unlocked.
- The card is not caught against the case.
If the card still refuses to move, consult the motherboard manual.
Do not use excessive force.
The motherboard PCIe slot is attached directly to the motherboard, so careless force can damage the board.
Do You Need to Uninstall GPU Drivers Before Removing the GPU?
This depends on what you are doing next.
If you are physically removing an old graphics card and installing a replacement, removing the old driver’s software before installing the new card can help avoid driver conflicts, particularly when changing GPU brands.
AMD’s official graphics-card removal instructions recommend removing existing graphics drivers and software before installing a new graphics card to avoid potential conflicts.
However, the exact driver-removal procedure depends on the GPU manufacturer and what you are replacing.
For example, changing from one AMD GPU to another AMD GPU is different from changing from AMD to NVIDIA or NVIDIA to AMD.
If you are only temporarily removing the GPU for cleaning or inspection and plan to reinstall the same card, there is usually no reason to uninstall the graphics driver simply because you physically removed the card.
Should You Remove GPU Drivers Before or After Physically Removing the GPU?
For a GPU replacement, there are different ways to approach the process. If you are moving to a newer NVIDIA card, you may also want to check our guide on whether the NVIDIA RTX 5060 is good for SOLIDWORKS if CAD is part of your workload.
A common approach is:
- Download the replacement GPU driver you will need.
- Remove the old graphics driver if appropriate.
- Shut down the PC.
- Disconnect power.
- Remove the old GPU.
- Install the replacement.
- Connect the required power cables.
- Start Windows.
- Install the new graphics driver.
The exact process can vary depending on whether you are switching GPU brands.
If you are using AMD graphics, AMD provides its own Cleanup Utility for removing previously installed AMD graphics and audio drivers before installing new graphics software.
Do not use a manufacturer’s cleanup tool blindly if you are dealing with a different manufacturer’s driver.
How to Remove a GPU for Cleaning
If you are removing the graphics card simply to clean your computer, you do not necessarily need to uninstall the graphics driver.
The physical process is the same:
- Shut down the PC.
- Disconnect the power.
- Open the case.
- Discharge static electricity.
- Disconnect GPU power cables.
- Remove case screws or retention hardware.
- Release the PCIe latch.
- Remove the GPU.
- Clean it carefully.
- Reinstall it.
When cleaning a GPU, avoid spraying liquid directly onto the graphics card.
Use appropriate compressed-air cleaning practices and keep the card dry.
If the fans are being cleaned with compressed air, prevent them from spinning excessively if possible.
How to Remove a GPU From an NVIDIA PC
There is no special NVIDIA-specific physical removal process for a standard desktop PCIe graphics card.
The basic procedure is:
- Shut down the PC.
- Disconnect power.
- Remove the case panel.
- Disconnect NVIDIA GPU power cables.
- Remove the case screws.
- Release the PCIe latch.
- Carefully remove the GPU.
The exact power connector and case retention system can differ between NVIDIA graphics-card models and manufacturers.
If the card uses a newer 16-pin power connector, make sure the connector is completely released before attempting to remove the graphics card.
How to Remove a GPU From an AMD PC
The physical process for removing an AMD Radeon graphics card is also based on the PCIe slot and case design.
AMD’s official procedure recommends disconnecting internal cables, removing the card’s mounting hardware, releasing the expansion-slot lever, and then removing the card from the graphics slot.
The same general process applies to most modern desktop Radeon cards.
Can You Remove a GPU From a Laptop?
Usually, no.
The guide above is primarily for desktop PCs with a removable PCIe graphics card.
Most laptops do not have a removable desktop-style GPU. Integrated graphics are built into the processor or system architecture, while dedicated laptop GPUs are often soldered to the motherboard.
There are exceptions involving specialized modular systems, external GPUs, or unusual workstation designs.
If you are dealing with a laptop, check the exact model’s service manual before attempting any GPU-related hardware removal.
What Happens After You Remove the GPU?
What happens next depends on your reason for removing it.
If You Are Installing a New GPU
Install the replacement into the appropriate PCIe slot.
Make sure it is fully seated and secured to the case.
Then connect the required power cables.
After the computer starts, install the correct graphics driver.
If the system does not display an image after replacing the GPU, check the seating, power connections, display cable, and monitor input.
AMD recommends checking that a discrete graphics card is correctly seated in the primary PCIe slot and connected to the PSU when troubleshooting display problems.
If You Are Removing the GPU Permanently
If your CPU and motherboard support integrated graphics, you may be able to connect the monitor to the motherboard’s video output.
However, not every CPU has integrated graphics.
For example, some desktop CPUs are sold without integrated graphics.
Check your CPU specifications before assuming the motherboard’s HDMI or DisplayPort output will work.
If You Are Selling the GPU
After removing the graphics card:
- Place it in an antistatic bag.
- Keep the original packaging if available.
- Protect the fans and ports.
- Include accessories that belong with the card.
- Avoid touching the PCIe contacts.
Proper storage can reduce the risk of damage before the card reaches its new owner.
Common Mistakes When Removing a GPU
Pulling the GPU Before Releasing the PCIe Latch
This is the biggest mistake.
If the latch is still locked, pulling the card can damage the motherboard or the latch.
ASUS specifically warns against forcibly pulling the graphics card before releasing the PCIe latch.
Forgetting the GPU Power Cable
A graphics card can remain attached to the power supply even after the case screws have been removed.
Always check for every power connector before lifting the card.
Leaving the PSU Connected
Do not work inside the computer while it remains connected to mains power.
Shut down the system and disconnect the power cable.
ASUS specifically instructs users to remove the system power cable when installing or removing a graphics card.
Pulling From the Wrong Place
Hold the GPU securely by appropriate structural areas.
Do not pull on the fans, cables, or delicate components.
Using Excessive Force
If a graphics card does not move, stop.
Find what is holding it.
The correct solution is almost never to pull harder.
Forgetting an Anti-Sag Bracket
Large GPUs may have a support bracket that must be removed before the graphics card can come out.
Putting the GPU on a Carpet
Avoid placing the exposed graphics card directly on carpet.
Use an antistatic bag or another appropriate protective surface.
How Long Does It Take to Remove a GPU?
For someone who has done it before, removing a desktop GPU can take only a few minutes.
For a beginner, it is better to take your time.
The actual removal is simple once the following are identified:
- GPU power connectors
- Case screws
- PCIe latch
- Any support bracket
The safest approach is not to rush.
What If the PC Does Not Turn On After Removing and Reinstalling the GPU?
If you removed the graphics card and installed it again but the PC does not display anything, start with the basics. If Windows loads but GPU-related performance or desktop rendering seems unusual, our guide on Desktop Window Manager high GPU usage can help you troubleshoot the software side.
Check:
- The GPU is fully seated.
- The PCIe latch is locked.
- The GPU is secured to the case.
- Every required power connector is attached.
- The monitor cable is connected to the correct output.
- The monitor is set to the correct input.
- The PSU switch is on.
- The main motherboard power cables are still connected.
AMD’s troubleshooting guidance recommends checking that the graphics card is correctly seated in the primary PCIe slot and connected to the PSU when a system has display problems.
If you use a PCIe riser cable, temporarily remove it and test the GPU directly in the motherboard’s primary PCIe slot if your system allows it.
How to Remove a GPU Without Damaging the Motherboard
The safest method is simple:
Disconnect everything, remove the case hardware, unlock the PCIe latch, and lift the GPU out without forcing it.
Pay particular attention to the PCIe latch.
Modern motherboards may use different release systems, so the exact direction or mechanism can vary.
If the latch is difficult to see, consult the motherboard manual before attempting to remove the card.
Related TechWiseZone Guides
If you are removing a GPU as part of an upgrade or troubleshooting process, these related guides may also be useful:
- AMD GPU vs NVIDIA: Which Graphics Card Is Better in 2026?
- Is NVIDIA RTX 5060 Good for SOLIDWORKS?
- Hardware Accelerated GPU Scheduling: Should You Turn It On?
- How to Fix Desktop Window Manager High GPU Usage
Frequently Asked Questions
How do I remove a GPU from a PC?
Shut down the computer, disconnect the power, open the case, disconnect the GPU power cables, remove the case screws or retention mechanism, release the PCIe slot latch, and carefully remove the graphics card.
Do I need to remove GPU drivers before removing the GPU?
Not always. If you are simply removing the GPU temporarily for cleaning, you generally do not need to uninstall the driver. If you are replacing the card, particularly when switching GPU brands, removing the old driver can help avoid software conflicts.
What is the latch on a GPU slot?
The PCIe retention latch is a small mechanism at the end of the motherboard’s PCIe slot that locks the graphics card into place. It must be released before the GPU is removed.
Why won’t my GPU come out?
The most common causes are a locked PCIe latch, a remaining case screw, an attached power cable, or a GPU support bracket. Check each one before applying additional force.
Can I pull the GPU out without pressing the latch?
No. If the motherboard uses a conventional PCIe retention latch, release it before removing the card. Pulling against a locked latch can damage the motherboard or graphics card.
How do I remove a stuck graphics card?
Do not pull harder. Check the PCIe latch, case screws, power connectors, and any anti-sag bracket. If the card still does not release, consult the motherboard manual for the correct PCIe release mechanism.
Do I need an antistatic wrist strap?
An antistatic wrist strap is a useful precaution, especially when working on computer components. At minimum, take appropriate precautions to discharge static electricity before handling the GPU.
Can I remove my GPU while the PC is plugged in?
No. Shut down the PC and disconnect its power cable before working inside the case.
Can I remove a GPU from a laptop?
Most laptop GPUs cannot be removed like desktop PCIe graphics cards. Check the specific laptop’s service documentation before attempting any hardware work.
Can I use the PC without a GPU?
Possibly. If your CPU has integrated graphics and your motherboard provides compatible video outputs, you may be able to use the PC without a dedicated graphics card. If your CPU does not have integrated graphics, you will generally need a dedicated GPU or another supported graphics solution for display output.
Should I remove the GPU before cleaning my PC?
You do not always have to. Light dusting can often be done with the GPU installed. Removing the GPU can make deeper cleaning easier, but it also introduces the risks associated with handling and reinstalling hardware.
Can I remove a GPU and install another one immediately?
Yes. Once the old graphics card is safely removed, you can install the replacement as long as the new GPU is compatible with your case, motherboard, power supply, and other hardware.
GPU Removal Safety Checklist
Before you close the case or move on to the replacement card, make sure you have completed the important removal steps:
- The computer is completely shut down.
- The power cable is disconnected.
- The GPU power connectors are unplugged.
- All case screws or retention hardware are removed.
- Any GPU support bracket has been removed.
- The PCIe retention latch is fully released.
- The graphics card is removed without excessive force.
- The GPU is stored in an antistatic bag if it is not being installed immediately.
- The PCIe slot and motherboard have not been damaged.
If the graphics card does not come out after these checks, stop rather than applying more force. Recheck the motherboard’s PCIe release mechanism and consult its manual, particularly if the board uses a proprietary release button or lever.
For a replacement installation, inspect the new card’s power requirements and make sure your power supply and case can accommodate it before installing the card. Once the new GPU is seated correctly and connected, Windows can be started and the appropriate graphics driver installed.
